Showing posts with label Stamp Camp. Show all posts

Wednesday, August 31, 2011

End of Summer Stamp Camp Favors & Sign...


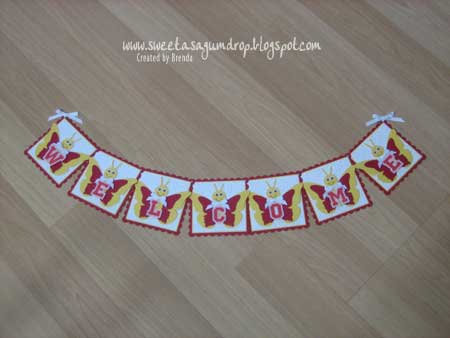
This is the welcome sign that I created for our End of Summer Stamp Camp. I used the Scallop Square & Beautiful Butterflies dies to cut these out. I also used the Vintage Wallpaper textured impressions embossing folders.


These are the favors that I created to match my welcome sign. I used the Beautiful Butterflies die and the Perfect Polka Dots textured impressions embossing folder. My upline was saving these containers which used to hold some type of powdered drinks, but after removing the labels & washing them out, I filled them with M & M's instead. It was actually nice to hear feedback from a few guests saying that they have been saving these containers, but just didn't know what to do with them... until now. I'm so glad that I created something that inspired someone. Thanks for stopping by...


Tuesday, August 30, 2011

End of Summer Stamp Camp Projects...


Here are the wonderful projects our guests got to make at this weekend's Stamp Camp. These projects were designed by Sonya, Naoko/Lorinne, Jane, & Jenn! Thank you ladies for doing a great job teaching everyone how to make these. Looking forward to our next Stamp Camp! Check back tomorrow to see the welcome sign and favors that I created for the Stamp Camp.

Sunday, February 27, 2011

Stamp Camp Favors & Sign...


Here is the welcome sign and favors that I created for our Stamp Camp that we are having today. For the favors, I used the Scallop Envelope die, Fun Flowers die, Perfect Polka Dots textured impressions folder, & Little Leaves sizzlits die. Most of the same dies were used for the welcome sign but I also added in some butterflies that I cut out with the Beautiful Wings die. I hope those of you who attend our Stamp Camp today will be inspired to create, meet some new friends, and have lots of fun! Until next time...

Monday, November 22, 2010

Holiday Stamp Camp Goodies...


Here is the welcome sign that I created for our Holiday Stamp Camp that was held this past Sunday. To create the sign, I used the following punches for the snowman: designer label, 1-3/8" circle, 1-3/4" circle, word window, & boho blossoms. I traced a bowl to make the large circle for the top of the snowglobe sign. I used a slightly larger bowl to trace and cut out a window sheet and snipped the edges. The edges were glued down with Tombow Multipurpose glue and then I added another circle to hide all the messy stuff... hehehe! The bottom portion was cut freehand and made a base to help it stand.


Here are the clips that I made for each of my guests that attended.


These are the snowman favors that I created for all of the guests. They each hold 3 mini Kit Kat bars... one of my favorite candies! But then again, anything chocolate is my favorite!

Here are the dimensions for the favors:
-2-3/4" x 6-1/2" whisper white cs scored at 2-3/4" & 3-3/4"
-2-3/4" x 2" basic black cs; corner round the top 2 corners (2-3/4" side will be on top); this will be the hat
-1/2" x 3-1/4" basic black cs; corner round the top 2 corners; this will be the hat's trim
-1/2" x 2-3/4" daffodil delight cs for the hat
-use the boho blossoms punch to punch out the flowers for the hat; add a silver brad in the middle of the flowers; attach to hat with a stampin' dimensional
-I used the glitter brads for the nose along with some 3/8" googly eyes.
-The mouth was created with circles punched out with the Crop-A-Dile (smaller circle)
-I used a small piece of velcro to close the 2 ends of the whisper white cs to hold the candy.


Here are the projects that the guests created: tags & pouch, luminaria, mini gift bag, and gift card holder. Thanks for sticking with me through this long post!

Don't forget to sign up for my birthday blog candy giveaway on my Nov. 6th post! Last day to sign up is Tuesday, Nov. 23rd! I will announce the winner on Nov. 24th!

Monday, October 4, 2010

Card Camp Favors & Welcome Sign...


Here is the welcome sign and favors that I created for our Card Camp that was held this past Saturday. Thank you to all of you who came. I hope you enjoyed yourselves, made new friends, and learned something new! I used the Fang-tastic stamp set for both and embossed the images... yes, I'm on an embossing kick right now... LOL! And for those of you who know that I like to cut things out, the little bats are embossed and cut out too! The ghost punch art was created using the Wide Oval punch and I just trimmed the bottom with my paper snips. Hope you like them! Can't believe October is already here! Have a great week!

Monday, September 13, 2010

Stamp Camp Projects...

Here are the projects that our guests created at our recent Stamp Camp! Thank you ladies for another great Stamp Camp!

This project was designed by Jane.


This project was designed by Naoko.


This project was designed by Sonya.


This project was designed by Stephanie.


Sunday, September 12, 2010

Stamp Camp Favors & Sign...


Here are pictures of the favors I made for our Stamp Camp today. I ended up making 76 of these and using the extra images that I colored to create the welcome sign too! I used the Greeting Card Kids stamp set to create both the favors and sign. I also used the square lattice texture folders. The instructions for the favors can be found here. Below are pictures of the welcome sign I made. Thanks for stopping by!


Tuesday, June 15, 2010

Stamp Camp Projects...


This stationery set was created by Sonya...


This photo holder was created by Naoko...


This wallet was created by Lorinne...


This mini chalkboard was created by Jane...


These are the projects that our guests created at our Summer Stamp Camp. I forgot to take a picture of our guests bags, but Shelby did a wonderful job on them as usual! Thanks to all who came and helped out. I hope to see you at our next one that will be held on September 12th!

Monday, June 14, 2010

Stamp Camp Welcome Sign & Favors...


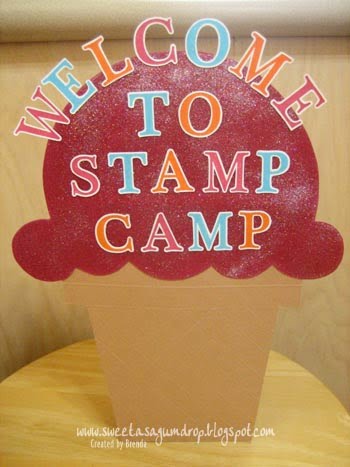
I still can't believe that the 3 day weekend has gone by so quickly, but that's what happens when you're so busy. My girls had a hula performance on both Friday & Saturday night out in Waikiki for the Pan-Pacific Hula Festival and DD2 also had a karate exam on Saturday. But to top it all off, yesterday was our Summer Stamp Camp! Whew... can't believe I survived the weekend! Boy, do I need a vacation! Okay enough rambling. Here is the welcome sign that I created for our stamp camp. I actually started off making an ice cream truck to match the favors, but let's just say that it didn't turn out the way I wanted it to... hehehe! So this is what I came up with, an ice cream cone.


This picture is quite blurry, but I tried to take a close up picture of the cone to show how I scored the cone.


This is the back of the sign. I had some extra mints after packing the favors so I decided to make a box to hold them in and attached it to the sign.


These are the favors that I made. I love these ready made boxes... super easy to use! All I needed to do was use the Sweet Scoops stamp set to decorate it. Thanks for stopping by. Check back tomorrow to see the projects that were made at out Stamp Camp.

Friday, February 26, 2010

Save These Dates...


Here are the dates for our upcoming events. Please email me if you would like more information at sweetasagumdrop@gmail.com. Thanks for stopping by!

Tuesday, February 23, 2010

SAB Stamp Camp Projects...


These adorable candy trays were designed by Lorinne...


Here are the projects that our guests made at our Sale-A-Bration Stamp Camp that was held on Sunday. This project was designed by Sonya...


This project was designed by Jane...


This project was designed by Shelby...


This project was designed by Naoko...


These are clips that I made for my guests' bags. I used my Scallop Square punch and the Forest Friends stamp set. I love that little bunny...

Monday, February 22, 2010

Stamp Camp Welcome Sign & Favors...


Here is the welcome sign that I created for our Sale-A-Bration Stamp Camp that was held yesterday. I used circle coasters and the Beautiful Wings embosslit to decorate the sign.


Here is the favor that I created for everyone. I used my 5-Petal Flower punch and punched out 6 flowers. I crumpled them up, opened them up, and used my paper piercer to make the hole for the brad. I also used the Bitty Box & Envelope die to cut the boxes out on the Big Shot. After making 100 of these favors, I think I've seen enough flowers for a while. And amazingly, my punch still works after punching out 600 flowers!

Monday, November 16, 2009

Our Holiday Stamp Camp...


Our Holiday Stamp Camp was held yesterday and it was another fun-filled day for our guests! This is a picture of the welcome sign that I created. Since it was "Holiday" themed, I wanted to make a gingerbread house. You might not be able to see it in the picture, but I scored lines on the house to make it look like bricks. I used the Tart & Tangy stamp set to decorate the house along with some punch art. I also wrapped buttons in saran wrap and tied it with dental floss to make the little candies.


These are the favors that I made for the stamp camp. 50 reindeers and 50 santas were on my to do list for a while, but once I sat down to start, it didn't take long to make them. I used the Petals-A-Plenty Textured Impressions Folder to design the triangle favor box along with some punch art.


These are the projects that our guests worked on and they were designed by Naoko, Jenn, Sonya, & Shelby. Jane also did a demo of the My Digital Studio. Even though I bought it a while ago, I still haven't had the chance to use it... or even open it! But now that I know how to use it, I guess it's time to sit down and try it out... no more excuses for me.

Saturday, September 12, 2009

Stamp Camp Favor & Welcome Sign


One more thing before I'm off to work on those favors... I forgot to post pictures of the welcome sign and favor that I made for the stamp camp today. For the monkey, I did the punch art for his face and used the build-a-bear die for his body. I used the heart punch (only used 1/2 the heart) and trimmed it for his tail. I cut another circle that would cover the back (to make it look a little neater). And of course I just had to use those Sweet Treat Cups (which I filled with Skittles)! I hope that everyone liked it. It was super easy to make and I had lots of help from my daughters. My 10 & 6 year old used the big shot to cut out all the bodies and my 4 year old helped me punch the shapes out. Now that's what I call teamwork! Thank you girls... I really appreciate all you do for me!

Stamp Camp Projects


Created by Shelby...


Created by Jane...


Created by Naoko...


Created by Jenn...


These are the wonderful projects we did at our Stamp Camp today. It was such a busy day and everyone enjoyed themselves too! I was inspired once again and have so many ideas stirring in my head. Unfortunately I won't be able to stamp anything till I finish up the wedding favors for my husband's friend. So I guess I'll be working on them tonight. I promise to post a picture of it when I'm done. Have a great weekend!